Category Archives for "Running"

10 Inner Bike Geek…100-mile run vs. 100-mile Mountain Bike


Since I can’t seem to get my SI Joint to completely heal up (thanks to freakin’ CrossFit…don’t get me started on that rant)…any of you CrossFit fans can take that concept and flush it! It’s an accident waiting to happen. I know the PT folks in town are licking their chops in the downed economy…business will be good. Anytime you mix free weights and speed, it’s a recipe for disaster. Bad disaster…ruptured biceps, bulging discs….trauma…you can’t concentrate on good form when you’re “bustin’ it out” for time. Mark my words, it may not get you today, maybe not tomorrow, but it will get you. Mark my words…

I had reservations before I went because I had looked into it before. But, like an idiot, I said I’ll try it. Well, to make a long story…well, less long…’cause this isn’t what this post is about…this issue with my SI Joint is keeping me from running. And, to confirm CrossFit as the reason, well, 2 PTs and 2 body work folks in town all separately connected my issue to CrossFit as the culprit.

Well, this little SI Joint issue means I’m confined to pool running and biking…again. But, onward and upward, right? What’s the silver lining…the moral to my story. Falling in love with the bike again. That’s new territory for me when it comes to strategic training.

To make the best of this crappy start to my ’09 running season, and thanks to Scott Wolfe for planting the seed, I entered the new High Cascade 100 Mile Mountain Bike race coming to Bend in August. I can’t run right now, but I can bike…so be it.

Due to 3 freak injuries (none caused by running), I’ve ridden more this spring than I have the past 2 years combined. I just got a new custom road bike built by some local dudes I know (Thanks Jason and Alan at Bend Bike N Sport). They welded up a nice steel road bike with XO Platnum steel. I’ve had it for a little over 2 weeks and it is smooth as buttah. I’ve been splitting my time between the road bike and my mountain bike each week, add in two to four 30-60+ min. bike commute rides on my cross-commuter and I’ve been in the saddle a lot lately.

I always said if I did something that didn’t allow me to run, I would start riding endurance mountain biking events. Well, it seems that time (albeit temporary) has come. So, I entered the new local race that boast 80% singletrack and is on my home turf. I’m excited for the cross-training that this event will force me to do all summer.

So many times we get blinders on as runners and don’t do other things, when we should…when our bodies could actually be more fit, more balanced and healthier by jumping on the two-wheeled machine a couple times a week for some leg flushing and some added cardio base. I was a bike geek long BEFORE I’d ever even heard of this crazy sport of ultrarunning. The bike is a beautiful invention and can get you superfly fit with some killer legs to boot. Also, it allows you to jump right back into running training when the time comes. Nice bonus.

I’m having fun geeking out on new training strategies. How do I incorporate new training techniques that allow me to train hard and peak for a June, September, and October 100 mile ultramarathon AND a 100 mile mountain bike race sandwiched in August too?! I’m looking forward to the change, the challenge AND the uncharted territory this new event is putting me into with regard to training.

I’m “keepin’ it local” and I’m scheduling a time to sit down with local guru cycling coach Bart Bowen at Rebound Sports Performance. I’m looking forward to Bart’s wisdom when it comes to cycling training and well, just getting in touch with my inner bike geek again. It’s a nice place to be spinning circles again. Giddyup.

2 The RUMBLE! Peterson Ridge Rumble 60k

High Point on the Metolius-Windigo Trail.
Photos on this post by Glenn Tachiyama.

It’s been a couple of years since I’ve run the Peterson Ridge Rumble. I’ve either had a race close or injured…so, I’ve been volunteering at an aid station (#2…the busy one) the past few Rumbles. Lots of action at that one, a cool boulder my son likes to climb on (with a really cool gigantic ant hill at the base). He gets a taste of filling water bottles and hangin’ out in the woods. Good times.

So, even though just recently recovering from my broken pinky toe and tendon strain AND some SI Joint soreness (thanks to tryin’ out CrossFit…another post to come on THAT one)…anyway, I knew I had some good base before the injury AND lots of cross-training under my belt. I was a little nervous, it being only my 9th run back coming off 5 weeks on the bike and pool running.

However, I did go do a “test” 23 miler on Tuesday, which I walked away from pretty dang sore from the pounding, but a mini-3-day taper knocked out the soreness, I sucked it up and said…”Ain’t gettin’ any younger” and pulled up my boot straps…er, I mean the fresh pair of New Balance 904TRs and got myself READY TO RUMBLE!!

Sean added some really sweet singletrack that the Sisters Trail Alliance just built last season. Awesome addition, including the bouldery, gnarly section before Aid 2…nice, Colonel. The weather was awesome, upper 60s at the finish, 22 and a bit chilly at the start (clear night in Central Oregon…the usual), but it warmed up quick. There were some decent frozen mtn bike ruts on the trail (I’m a mtn biker…Spring unwritten rule…ride trail in the morning BEFORE it thaws in the early spring…please y’all…’nuff said).

I ran with the Eugene-homeys Wolfeman and Lewis T. and Ashlander Eric Poole for the first 6 or 7 miles…but, with the limited mileage recently, realized I couldn’t keep pumping their pace. So, I backed off a touch, paced myself for my fitness level and ran by myself. The frozen canyon coming back down to the creek was sweet before The Grunt. The patchy snow/ice mix was fun picking fast through it. I was settling into 6th with no one around until I got to the Cinder Road climb (at 23 or 24 miles) before the Metolius-Windigo and Curt’s Aid Station.

I was just settling down to enjoy the power hike/running transitions up the long road climb, when I glance over my shoulder and see Will from Corvallis coming up on me…dang, dude. Okay, no matter what place I’m in, I don’t like giving up a place…okay, okay, I’m a little competitive…can’t help it, Bronco Billy likes to win…even if it’s winning 6th place. It’s the same with Monopoly.

So, I took a gel and ran the whole dang hill…by the top I couldn’t see Will anymore, cruised through Curt’s aid and on to some downhill. I knew running that would take a bunch out of my legs, but it was fun none the less…got that hill over with quicker.

The metolius was pretty gnarly from half frozen, too many horse prints. That section is a BIG horse area, my ankles paid the piper a little with lighter shoes and not much running volume recently. By the time I hit the last last aid station, I was torched…the Cinder Butte came to call. But, I just maintained and got across in 4:31. Good Rumble, Colonel. Giddyup.

8 Horse Butte 10 Miler

I was the first finisher to down a Natural Oregon Country Beef Dog about 5 minutes after the finish…ah yeah! ultrarunner iron gut, baby!

Another 1 day cold snap for the Horse Butte 10 miler. It has been COLD every year for FootZone’s Horse Butte Trail Race. It was a great day just the same. I got up and road my cyclocross commuter bike to the start for some extra credit and a warm up. The trailhead is about 12 miles from my house.

It was almost 60 and sunny on Saturday, but I woke up on Sunday to 23 degrees, windy and a fresh dusting of snow on the ground. The 8am bike to the trailhead was freakin’ cold! But, I’ve been riding a lot lately and I’m getting pretty used to it.

I saw the usual herd of mule deer in the old burn meadow by Bessie Butte on my way up China Hat Road (the back way to the trailhead). I spun into the parking area to hear Super Dave yelling “8 minutes to the start!” Perfect. I quickly unlayered, locked my bike to a Ponderosa, threw my extra gear in my pannier packs, traded my SPD shoes for the Mizuno Wave Ronin 2 and walked to the start line with 2 minutes to spare and a 53 minute bike warm-up on my legs.

We took off and immediately Andy Martin shot off the front (not a surprise) with Damon Kluk close behind him. About 4 of us settled into places 3-6 in a little group for the fist half mile…I was in 5th. By about 3/4 of a mile I was finding myself wanting to stride out more and the guy in 4th was slowing down from the start adrenaline. So, I passed him when the trail allowed and went into a comfortable stride. First mile split was 6 min. flat.

By the first switchback climb up the first plateau, I was still in 4th with a comfortable gap on 5th and pretty much stayed there the rest of the race. DANG! It was REALLY windy on the return part of the loop the last 5 miles! It’s an old burn and there aren’t any trees and it’s pretty exposed to the west. The wind was whipping hard. Nothing like a hard headwind for resistence training the last 5 miles! I ended up running a 1:05:45.

I didn’t see 3rd place for the remainder of the race…he ended up being about 2 minutes in front of me…Damon ran a minute faster for 2nd and Andy crusied in for the win in 58:50. I was happy, as it was my 5th run back on dirt in the past week, since coming off the past 4 weeks of the injury and biking and pool running only for training. I was able to hold LT pace for 58 minutes, which I hadn’t planned on. If any of you folks get injured, get in the pool for 2 or 3 hard Lactate Threshold workouts a week while you recover. It’s boring, but it’s the ticket to keep your high end.

Time now to get ready for the Peterson Ridge Rumble 30k in 6 days (or the 60k…still an outside chance I might try to slog the 60k on the limited running I’ve been doing…tempting). I have been biking A LOT for long volume. I’d much rather run the 60k if I had a choice…hmmm.

Giddyup!

The Bad Ass 50k

22 down, 9 to go…still smilin’: I was still feeling good here, about 30 minutes before I ran out of salt and death marched the last 5 miles.
Bad Ass Weather: Runners making their way up the east side of the Cinder Butte in the early morning sunshine on nice dry dirt after the initial out and back section.

Another successful Bad Ass 50k under our Big Ass belt buckles. We were fortunate once again for the 3rd year in a row with favorable weather. We had perfect January running weather in the desert just east of The Badlands. Sunny, calm…it read 7 degrees at 7:45am when I drove in, but it felt warmer. As soon as the sun was up and hit the desert floor, it warmed up quick. It reached the high 30s, low 40s by midday. Dry dirt on the entire route this year. So, nobody needed studs. Awesome weather. By lap 3 I was hatless, arm sleeves and tights pulled up and sweating. I even got a tan on my buzzed head!

This year, The Colonel and I decided to move the Start/Finish/Staging Area about a 1/4 mile west of the old spot, into a more open, sunny spot. It gets sun earlier in the morning, as there is a nice size wide-open sage brush meadow to the east of the spot. It’s located right at the base of the Cinder Butte.

This year we had over 50 folks show up and at least 15 pooches to run the various distance options. FootZone’s Teague Hatfield marked the course (thanks, Teague). Again, the Harshburgers brought soup and manned the “pot luck” table after they ran the Super Slacker Super Dave 9-miler. Others brought donuts, brownies, cookies, oranges, Clif shots and we had some water jugs. We even had a camp fire this year. The weather was perfect for January. Thanks to all who brought something to share, put another log on the fire, or helped out in any way.

We only had 6 step up to become a Bad Ass this year and run the entire 50k distance with 3,600 feet of climbing. The Super Slacker Super Dave 9 and the Half Ass 13 still are the most popular distances for this time of year. There is about 1,000 feet of climbing per 9 mile loop, the 13 has 1,610 feet of ascent and the 22- has 2,610 of ascent. Nice training spot for mid-winter.

Sean and I both ran the 50k this year and he, like a smart runner, ran the first loop mellow, while I ran the first 13- with Katie Saba (a very fast marathoner) and she was only running the 13. Needless to say, the pace was probably a bit too fast for the first 13, but it’s just training, right? Why not throw down and see how the chips fall. Sean caught me by the top of Smith Canyon on lap 2 (about mile 19 or 20) and we ran together until about 25-26 miles.

We were cruising the last lap in reverse down Smith Canyon and I started getting crampy. I took a S-cap, waited 5 minutes, still crampy, took another (my last), still crampy….dang…Bye, bye Sean. He continued on at our pace, while I slacked off and death marched it in. I ran out of gel and water with 5 miles to go and just trudged it in, hurting the last 5.

NOTE TO SELF: Remember your first really long run after time off, carry extra salt and extra gel. I do this EVERY year in the early season. Forget how much salt, water, and gel I need in the 3-4 hour range. It’s always better to have more than you need than not enough!

The Colonel cruised in for a new course record of 4:23 and I slogged it in about a minute under the old record in 4:34. The old record was held by Justin Angle’s dog Piper. He outsprinted Rod and Justin last year by about 10 yards at the finish.

Thanks everybody, it was another great day out there! Giddyup.

14 How to Screw Your Shoes

Krissy Moehl and I enjoying Bend’s winter wonderland on the Footzone Noon Run (held every Wednesday, rain, snow, or shine). And yes, we both have studded shoes in this picture.

My buddy Scott Wolfe just emailed me about how to “stud” his shoes, so I thought I’d post a How To. Normally he doesn’t need such a set up in Eugene, but with this recent Arctic surge from the north, Old Man Winter gave them an ice storm and Central Oregon our first dump of snow. So, Wolfman, this post is dedicated to you, buddy.

I just got back from an hour tempo run on hard packed snow with the set-up pictured below. It’s easy and way better than Yak Traks and they work fine on dry pavement if it gets patchy…just like spikes on an asphalt track (for you former track runners out there).

Please be warned that NOTHING is great on sheer ice. If you hit a sheet of ice, be careful. But, you’ll be surprised how well this works. Happy winter running…giddyup!

How To Stud Your Running Shoes:

Supplies:
1) Drill with quick attachment (the attachment acts as a mini-socket)
2) 3/8″ #6 hex head sheet metal screws
3) Running Shoes
4) Table and a C clamp is not necessary, but makes the job WAY easier

Hex Head Screw Type

Here’s the kind of sheet metal screw to use…

#6, 3/8″ hex head

I haven’t found 1/4″ in a hardware store as a standard stock item. So, this is the lightest and smallest I’ve found. Every hardware store will have them.

Drill with Quick Attachment

Any drill will do. I have DeWalt Quick Attachment for my Makita, but any will do. The standard Quick attachment acts as the socket and fits #6 hex heads just like a socket and bolt.

Screw ‘Em In

I usually use a clamp on a table, like a “C” clamp or a quick clamp of some sort to hold your shoe down, as you really need both hands to hold the tiny screw on the end of the quick attachment to get it started.

Pattern

Here’s the pattern I’ve found to be most minimalist while being still very effective. Place 3 in a triangle in the back, 5 in a horse shoe shape in the front. Screw them into the fatter lugs (if it’s a trail shoe).

Each shoe pattern is different, so you have to get creative, but this is the general placement. Don’t place any in the middle where the main contact weight of your foot strike will fall. I’m a mid-foot striker and only put one in the very back. However, if you are a hard heel striker, I would maybe place 2 in the very back of the heel vs. one for a little more grip. Make sure you check your pattern periodically, as you may loose one sometimes. We run a lot of trail, even in winter in Central Oregon and the rocks will catch and pull the screw out sometimes. But, not a big deal, get home and throw another in.

NOTE: They don’t hurt the shoe, so if you get them in and don’t like one or two, put your drill on reverse and take it out and put it in another spot. Also, after you get one done. Set it next to the 2nd one you’re working on to ensure your placing them in the exact spot as the opposite shoe.

Giddyup!

5 Strawbale Chicken Coup and Earthen Plaster Done!

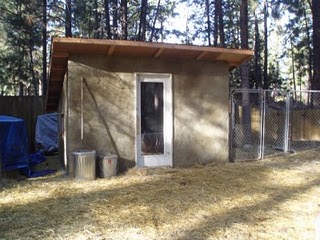
Chickens using their new digs. Cured rough earthen plaster coat finally done (note the damp spots that are still curing on the this northwest side of the coup along the base). The boxed window turned out cool. They really like roosting in it and hanging out there. Note the door is an old kitchen cabinet incorporated into the bale wall.

Well, we’re done. Coup is earthen plastered, tarps are off (still a few damp spots, but mostly dry), electricity is run and lights are on a timer to give them their extra “daylight” for laying (they need 14 hours of light to lay eggs).

AND I’m running again after 6 weeks off and about a month of 3-4 days per week of easy running. Nice to be back to semi-normal schedule and not thinking about the half-finished chicken coup every waking second…we beat the snow! Giddyup!

Here’s the recap in photos…


Coup baled, mesh wired and ready for plaster coat.

Plaster Mixing Zone: Left pile is rough sand (grade used in concrete mixes), Right pile is Bentonite Clay and the straw bale tarped square is for soaking chunks of clay to soften it. It constantly had a supply of clay in it after I screened (wood framed thing leaning against bales) the clay to mix in the concrete mixer.

Plaster after it comes out of the concrete mixer. Since this was a rough coat, the mix was closer to a cob mixture in texture, with a little more clay in the ratio than the standard cob mix to make it stickier. I used lots of long straw. I usually ended up with 2-3 five gallon buckets of plaster every batch. However, if I was doing 3 (15 gallons)…it was hard to mix it. I found 2 buckets was ideal cause the batches mixed nicely and didn’t overload the mixer.

Rough Plaster Recipe for approx. 10-12 gallons of plaster: 12 handfuls of straw, 2 to 2 1/2 gallons of water, 1 cup of Borax (prevents mold). Start Mixer to mix it up. Then, add 7-8 shovel fulls of clay, 11-12 shovel fulls of sand. I would periodically stop the mixer and pull the clay off the back of the mixer wall and paddles and add another handful of straw in the back, start mixing again. Sometimes had to add little more water if the sand isn’t mixing in well (e.g. dry mix). I usually added an additional 5-8 handfuls of straw, one handful at a time, as I stopped the mixer to pull the clumps apart or off the back of the mixer. If the mix was not very sticky, I just added a half or quarter scoop of screened clay and a squirt of water from the hose and it usually made the batch way stickier. It was trial and error and eventually I ended up knowing how to compensate for certain conditions in the mix…more straw, more sand, more clay, more water, etc. depending on the condition. It’s like anything, you have to actually do it to learn it. I had read A LOT, but doing it makes you KNOW it.


Tea Time: Just because I’m covered from head to foot in clay plaster, doesn’t mean I can’t be civilized! Once I got the hang of the mixing, I started to brew tea and bring it out in a insulated carrier to enjoy a cup of tea while the mixer did the work.


Jennifer applying what I like to call the thin “push coat”over the mesh wire. She usually did the first thin coat and pushed and smeared the plaster into the screen. I came along behind and added thicker coat to even out the wall and fill all thin spots and seal edges really well. It was a good team effort!


Earthen plaster coat is on and drying. The tarps are to protect the wall while it cures from weather, wind and sun. It needs to cure slowly. A few times during the curing time I sprayed the walls down with a hose. It allows it not to crack as much and cure slowly. It’s a really rough coat and I probably didn’t wet it often enough, as I got some cracks. But, it is a chicken coup. My graphic design ego had trouble with this one. Perspective, Jeff, perspective.


Tarps off, finished coup. Just need to paint the door and roof eaves come spring. We also plastered the interior which looks cool with the built in laying boxes and exit door.

Trap door to laying boxes from outside (old cabinet turn on it’s side) and the cured earthen plaster wall up close.

Happy chickens!

10 Coon Attack

Dang Coons! We lost one chicken (one of our new young soon-to-be layers) last night to a pair of Raccoons who staged a night time assault on my makeshift chicken coup that was serving as a temporary housing spot while I finished the straw bale coup.

I was working about 10pm in my office when Jenn yelled frantically down the stairwell…”Something’s getting the chickens!” I ran upstairs, grabbed my headlamp and ran outside to ALL hell breaking loose!

A Raccoon had scaled the mesh fencing and got hold of one of my chickens through a 3″x6″ gap in the roof eave of the temporary chicken run and was trying to eat and pull it through the hole. It bolted as soon as I came up running and I chased it down the fence—it climbed a tree and jumped over the fence.

I turned my attention to the 2nd one. The sucker was just standing there watching me…waiting to see what my move was. I’m sure he wanted to stay around and get a chicken dinner and was NOT leaving unless he had to. I grabbed a 2 foot piece of fire wood and chased his striped-tailed ass up the fence the other way and into the night.

Let me say, these had to be two males…they were freakin’ huge! Probably at least 25 pounds and at least 2 1/2 to 3 feet long. I was pretty darn close and got real good looks at them. I was within 6 or 7 feet of the first one before he scaled the tree and fence.

My poor young chicken was really messed up, she was hanging out of the gap, upside down, blood dripping, squawking a horrible squawk. I pushed her back in and she jumped down and was obviously messed up. We decided, even though the new coup wasn’t plastered, we had to move them in the new coup right away.

So, Jenn stood guard over the chickens while I rushed around with a headlamp and finished putting latches on the doors and getting the roosting bars installed inside the new coup. Luckily, the coup is all done except for the plastering and it’s totally predator proof…after loosing 14 chicks in Terrebonne, I wasn’t taking any chances with the coup I was building.

After the chickens calmed down and went back to roosting, we went in, put them in portable dog kennels and transported them to the new coup. Sadly, I had to put the one who got attacked out of her misery, she was pretty mangled with deep wounds on her spine and neck and was in shock.

I put out a live trap last night, but they didn’t come back. I’ll keep trying.

Strawbale Chicken Coup Project

The kids during the window box construction, testing the “load bearing” capabilities, as bales will be stacked on top. They really enjoyed the whole bale building process with all the fun bales to climb and play on. We built hay forts and houses and tunnels. I ended up with some leftover bales and they still have a hay playhouse next to the coup under a tarp.

This is why I’m not running very hard right now…trying to beat winter. I’m almost ready to earthen plaster the bales. I’ve had clay and sand delivered from the quarry and have done some test balls to see what ratio of clay to plaster is looking good. I chose bentonite clay, as it was available at my local quarry and has a better water proof property. Sand is a rough sand that is the grade commonly used in concrete mixes.

There are definitely some things I’d do differently with regards to the bale construction process and the framing if I did it again. I found a great online resource and would follow a lot of his philosophies if I do it again. (See http://www.strawbale.com) I’m thinking a straw bale workshop/studio at some point.

Most importantly, DON’T use 2×4 stud frame. Invest in 4x4s and design as a minimalist timber frame structure…less trimming bales, as working around the studs was time-consuming and a pain in the neck. Also, the chicken wire was a pain. I’d use some kind of poly mesh next time. My forearms look like I got in a cat fight.

Another boneheaded thing I did was install the chicken wire on the oustide BEFORE bale infill. Stupid move. It was a pain to go back and infill shallow spots that the bales didn’t quite fill against the mesh by cutting and stuffing, then re-stapling the cut holes. Royal pain.

Bales are filled all the way to the ceiling. The side upper plywood will have metal tin panels over them for a “mod-Dwell-magazine” style look. Lower 4 feet where you see bales will be earthen plastered. I’m not going to get the plaster’s finish coat done before winter. I’m shooting for one rough scratch coat on inside and outside in the next week (very similar to a cob type mix).

Here are some picks of the process…

Side view during construction of the roof, rectangle area will be a window.


Window box completed during bale infill. Note the chicken door on the right. It’s a narrow used cabinet installed into the bale wall. That will be the official chicken entrance into their run.

Coup during bale infill. The cabinet on the left turned on it’s side…used cabinet from a local used place called Pack It. I made it into 3 laying boxes on the inside and was the width of my bales (see photo below for the inside shot and more info). The other thing I did was frame the main door to a standard door size (38″ x 7’4″), went to the local used place and picked up an insulated exterior door with glass and frame for $30…tacked in a top 2×4 to the exact height of the door I found, added one more vertical 2×4 to the exact width of the door, screwed it in and…BAM! nice door for cheap. No door construction needed. It was about a 20 minute install.

The layer boxes (old cabinet on it’s side with some plywood customization). The laying box floor on the inside is slightly slanted toward the back and I will glue outdoor carpet on the floor of each laying compartment. When you open the cabinet door (on the outside…see image above this one), there is a trough that eggs, after being laid will roll to the catch trough for collection by the kids from the outside door. Idea is they can’t smash the eggs AND we can leave them for almost a week with food and water and they can lay all they want and we come back and collect out of the trough.

1 Movin’ to “The Woods”

The house from the upper half of the property.
The 1/4 acre crater complete with picnic table, 2 firepits and cliffs to climb on. This shot is taken from the North Rim of the crater (the tallest cliff, at 15 feet)

Well, sorry for the lack of posts the past 2 months. Busy as can be with the new house move. We just bought a house on an acre in an area south of Bend’s city limits. And as an added cool bonus, the acre has a 1/4 acre, 15 foot deep crater (photo above).

I have to say, after a few weeks in the new place, it’s nice to be back in Bend. Terrebonne was just a little too far out. I’ll miss the everyday training runs at Smith Rock, but the new locale is just close enough for me to commute to town on my bike, but have nice privacy and room for the kiddos to run.

An added bonus is my home office has it’s own entrance and it’s own bathroom. It’s really quite perfect for our family. We’re feeling mighty blessed in the current “economic crisis.” Plus, being above town 500 feet (we’re at about 4000 feet)…we’ll get some good snow on the property. Sledding, snowboard and ski jumps right in the yard! Sweet.

After we closed on the house in mid-Sept, I left 7 days to work on the house before we moved in. I pulled over 100 hours labor on the house! It was an epic ultra-labor week. I put in cork floors in 4 rooms and painted 3 rooms and worked on the chicken coup.

Also, my good buddies Josh and David designed and installed built-in shelves and a “hobbit” size walk-in closet in the loft to convert into an official kids bedroom. On one of his days off from work, my friend Tyson helped get up the skeleton frame for the chicken coup (which I’m still working on). Strawbale chicken coup post coming…giddyup!

4 Bronco Billy Birthday Epic…37, baby!

Well, this was my 10th anniversary of doing something epic on my birthday. Rules are…these are self-imposed rules, mind you:

1) Must be within a week of actual birthday.
2) Must run or ride (or combination thereof) at least age in mileage.
3) First choice is to run
4) Second choice is to run and bike
5) Third choice is to bike

I’ve mostly run my age in the past 10 years, but if a race is very near (within a week or two), I usually do a combo of biking and running. This year, I decided to ride my cross bike from Willamette Pass Ski area around 18.5 miles to where the Waldo 100k course crosses the Road 4290, stash my bike in the woods, and run the last 25 miles of the Waldo course back to Willamette Pass. Drive around and pick up my bike on the way back to Bend. Sweet plan, I must say.

I drove up on Friday, August 1, crashed in my car, got up and was off before 8am on my bike. Check out the video of my epic below. Great day.